Skip to content

Category: Tutorials

The Perfect Clutch in Less Than an Hour

Bolsa Chica's Clutch
Bolsa Chica's Simple Clutch

The holidays are on their way and you know what that means, right? Parties! Save a little cash this year by whipping up this cute little clutch by Bolsa Chica to match all your pretty party dresses. I haven’t tried it out yet, but the tutorial looks very simple and can be completed in less than an hour. I’m thinking it would also make some great hand made gifts as well. (Did you know there’s only 12 weeks until Christmas?)

After you check out the tutorial, take a look at the Bolsa Chica Etsy site as well.  She has some adorable purses over there that I would be buying up if I had the extra money right now.

1 Comment

Tutorial: Fleece Tie Blankets

Football season is here again and that means the cold winter months are just around the corner.  One of my favorite things to do in the winter is to snuggle up on the sofa with a warm fuzzy blanket.  My son has also adopted this habit of mine so we’ve collected quite a stack of warm blankets in our living room.  Why so many?  We have two dogs and two cats so most of the time half of the blankets are in the laundry waiting to be de-furred!

In my search for the perfect cuddly blanket, I discovered no-sew fleece tie blankets.  They are the perfect blanket to snuggle under when those cold days hit and they are super easy to make.  I can finish a large one off in about an hour (while watching TV) and a small one in even less time.  They make great baby or toddler gifts, and would also be a great craft project for kids to do on a snow day.

The best part is you can find fleece in so many different patterns that you can easily customize them for that special person.  My favorite is my Boston Red Sox blanket.  My son loves his Cars blanket.  And my husband?  He’s about to get his hands on a brand new New Orleans Saints blanket to keep him warm while he hollers at the TV this season.

Here’s what you’ll need:

2 pieces of coordinating fleece fabric (1-2 yards of each depending on size you want)
scissors (or rotary cutter and cutting board)

Seriously, that’s it.  If you are obsessive about straight, even lines then you may want a tape measure or yard stick to help but I just go for it and they always look fine.

Here’s what you do:

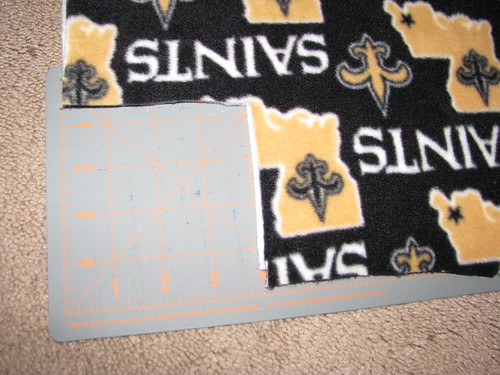
Lay the two pieces of fleece out flat with wrong sides facing.  Cut fleece to preferred size.  I generally use 1yard for a baby blanket, 1 1/2 yards for a toddler/child blanket, or 2 yards for a teen/adult blanket.  Keep in mind that you will reduce the size by 3-4 inches in all directions when you do the ties.  Trim edges so that they are even.

Cut a 3-4 inch square through both pieces of fabric in each corner and discard.  If you want the ties shorter do about 3 inches.  If you want them longer you can go 4 inches (or however long you want them to be).  Be aware that the fleece stretches a bit in one direction and not the other. If you make shorter cuts you may want to cut a bit longer on the non-stretchy side.

sept_08 373

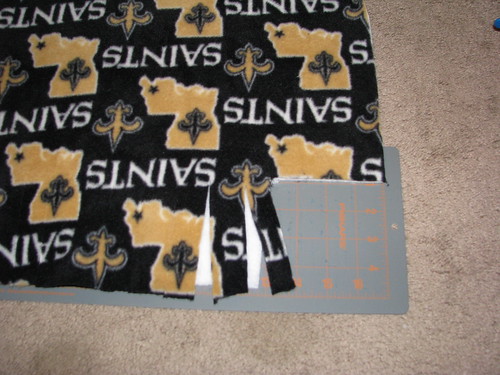
Next, cut the strips for your ties.  Again, cut through both pieces of fabric.  Cut each edge into 1 inch wide strips, 3-4 inches long.

sept_08 378

After you are done cutting (and your hand stops cramping) start tying the two pieces of fabric together (one strip from each fabric).  I do double knots to keep it from coming apart in the wash.  Some suggest tying every other strip, then flipping the blanket over and tying the remaining strips to keep things even.  I’ve never done it that way, but it can’t hurt to try, right?

sept_08 381

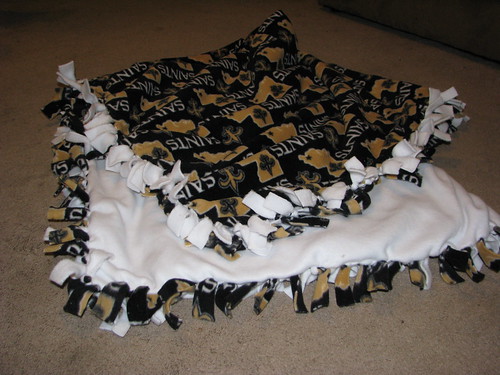
When you have tied all the strips together, you’re done!

This is such a fun and easy craft.  I’ve made tons of them and have even had special requests.  You can easily adapt the size to make pillows (tie 3 sides, insert pillow form, tie remaining side).  I even made a tiny little snuggle blankie for my daughter using some left over scraps.

3 Comments

Something Old Becomes New Again

*tap…tap…*

Is this thing on?

Oh, hi there.  Glad to see someone is still checking in here even though I haven’t updated in over a week.  I’ve been a little busy doing some scholarly research about teenage vampires.  That *cough* research has kept me from doing much of anything else including laundry, housecleaning, or crafts.  Fortunately, my sister has the rest of my books so I can’t read any more until I get them back in my possession this weekend.

So, while I have a few spare moments, I wanted to share a few of my favorite finds this week.  I always dreamed of making cute little dresses and hair accessories for my little girl and these crafty ladies are making it so easy for me.  The best thing about all three of the fun sewing tutorials I discovered this week is that they all re-purpose old items to create something fun and new.

  • These easy headbands from Maya Made are just perfect.  Not only do they re-use old t-shirts, but you can custom size them.  Store bought headbands never seem to fit me right so I can’t wait to make a few of these for myself.
  • A Room Somewhere has a great tutorial for the popular pillowcase dresses.  Of course using an old pillowcase gives more of a vintage look, but she gives directions to make it out of regular fabric too.  I’m hoping to make a couple of these in a mini version for my baby girl next summer.
  • Over at The Long Thread there’s a super easy tutorial for some adorable t-shirt dresses.  I know a couple of little girls that would look very cute in them!
Comments closed

Tote Bag Patterns and Tutorials

Multimedia messageThis is the very first tote bag I made. I think I was more impressed than anybody that it actually came out as well as it did. I intended for it to be a small diaper bag/purse that I could carry for a quick outing or trip to the store. It has definitely been used for that, as well as many other things in the months since I made it.

Today there was a comment on my Flickr account asking me if I had a pattern for the bag. I do have a pattern. Unfortunately, I downloaded it and didn’t keep track of the website that it came from so I can’t link to it. I searched and searched today and still can’t manage to find it (if anyone recognizes the pattern and has a link please share!), but I did find some other great patterns and tutorials that I wanted to share.

Here are some that I’m hoping to try out soon:

If those are too easy for you and you are feeling a bit adventurous, you might also want to try experimenting with some adjustable straps like the ones in You SEW Girl’s Adjustable Strap tutorial.

Are there any other great patterns or tutorials out there that I missed? Have you tried any of these that I listed? Leave a comment and let me know!

6 Comments

Need To Line Those Crocheted Bags?

If you haven’t noticed by my recent sewing projects, I have a thing for handmade bags. Years ago when I first started learning to crochet I made a few little handbags but I always wanted them lined and didn’t quite know how to do it. I didn’t have a sewing machine at the time either, so I put together some very sloppy hand sewn linings for those bags and well, they just didn’t last. If only I had this great tutorial from Futuregirl around back then, perhaps I would still be carrying those cute little handbags around.

*photo by Futuregirl

Comments closed

Cozy Pouch For Your Ipod

via Made by Petchy
photo via Made by Petchy

As I was stumbling around some craft blogs this week, I came across this great tutorial for a homemade iPod Nano pouch over on Made by Petchy. It looks so soft and cozy. I think every iPod needs one! I don’t have an iPod, but I’m pretty sure I can adapt this for my Zen.

Related Posts Plugin for WordPress, Blogger... 1 Comment