Skip to content

Tag: bag

Halloween Is On The Way

Tomorrow is September 1st which marks the beginning of Halloween shopping for me!  Before I had kids I absolutely hated that Halloween stuff was out so early every year, but now I know it sometimes takes that long to find just the right costume for your little ghouls and goblins (or you know, Princesses and Buzz Lightyears).

One thing I never can seem to find is a good trick or treat bag for my kids.  We tried several different store bought bags, plastic grocery bags, and even the cheap plastic pumpkins, but never could find something that was comfortable to carry, didn’t drag the ground (for the little ones), and held plenty of goodies.  That’s why last year I decided to just make my own.

Trick or Treat Bags

They were so fun and easy to make that I made up a bunch of them to sell and give away. My kids and my nephews all used them last year and they were a huge hit.

Trick or Treat Bags

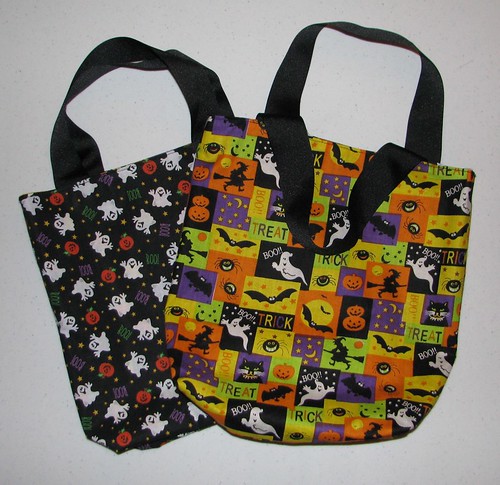
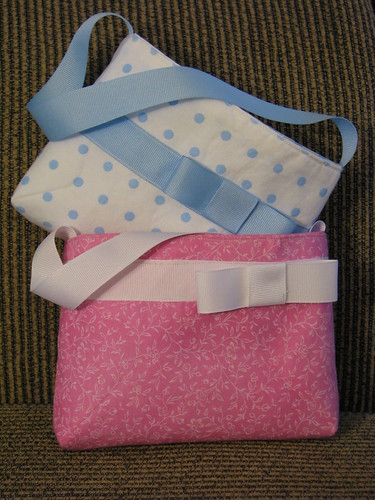
Each bag is reversible, as shown in the pictures above. Of course they don’t have to be used as Trick or Treat bags, they make great tote bags for just about anything!

And of course the reason I’m telling you all of this, is that I have 4 of these cute little bags left over and would love to get rid of them. I’m selling them for $10 each and I have 2 each of the two designs. Size may vary slightly.

If you are interested, please e-mail me at dee@gettingcrafty.com. I’ll take payments by PayPal only. If you absolutely cannot do PayPal let me know and we’ll talk, but I can’t guaranty that I’ll make an exception.

Comments closed

Simple and Practical

Somehow on Saturday I managed to find a chunk of time where I was not being needed by anyone else.  Evie was napping, Zach was watching a movie, and Hubby was on his computer.  I suddenly found myself with absolutely nothing to do.  Instead of sitting doing nothing, I decided to go dig through my fabric stash and whip up a couple of things that have been sitting in the back of my mind for a while.

First up was this cute little camera strap cover.  The strap that came with my camera is fine, but when I’m carrying it around on all day outings, it tends to really rub my neck.  I made the cover out of a soft flannel fabric and it feels much nicer slung around my neck.  It is basically just a tube that slides up over the regular strap so it can be easily changed out for another one or taken off for washing.

Camera Strap Cover

Next, I used the same fabric, along with a coordinating striped fabric and made a small makeup pouch to take with me when we travel. I don’t wear a lot of makeup, and actually could have made this a bit smaller for what I do carry, but wanted just a small little bag to throw in a purse or suitcase for those occasions when I want to dress up.

Makeup Bag

Makeup Bag

Both were fast and simple projects. I love when I can make something useful and save a little money at the same time!

4 Comments

Tutorial: Toddler Purse

Toddler Purse Tutorial

My mom and I have been searching all over for some little toddler sized purses for my daughter and my niece with no luck. I did find some on the dollar aisle at Target, but I’m sure they would be torn to shreds in no time. My mom wanted to give them to the girls as Easter gifts, but we just never could find the right thing so I decided to pick up some fabric that would match their Easter dresses and make them instead.

Since we looked all over for them and never did find any, I figured there has to be someone else out there looking for the same thing. I decided I would share how I made these in a tutorial so no little girls have to go without purses. 😉

(My apologies ahead of time for the horrible pictures. I had terrible lighting where I was working.)

Supplies:
2 pieces of fabric 9 x 12 inches (fat quarters would work great for this)
2 pieces lightweight interfacing (iron-on)
approx 1 yard of 1 inch wide grosgrain ribbon in coordinating color
coordinating thread
fabric pencil or marker
fabric glue (optional for making bow)

  1. Cut fabric and interfacing into two 9×12 inch rectangles each. Iron interfacing onto wrong sides of fabric.
  2. Toddler Purse Tutorial

  3. Take one piece of fabric and pin a 9 in. strip of ribbon onto each end approximately 1 in. from edge.
  4. Toddler Purse Tutorial

  5. Sew along the very edges of ribbon.
  6. Toddler Purse Tutorial

  7. Make bow with ribbon and attach on top of ribbon stripe. I made a simple loop bow and attached it by sewing just under the top loop.
  8. Toddler Purse Tutorial

  9. Fold in half length wise with right sides facing. Pin sides and seam with 1/2 in. seam allowance, leaving top open. Repeat with second fabric piece to make the lining.
  10. Toddler Purse Tutorial

  11. Open seams and iron flat, making a point on the bottom edge.
  12. Toddler Purse Tutorial

  13. Flatten bottom corners. Measure up 1/2 inch from point and draw straight line to box corners. Seam across line on all four corners.
  14. Toddler Purse Tutorial

  15. Turn lining so that the right side is facing out.
  16. Cut 12 inches of ribbon and pin one end along the top edge of each side, centering with seams. Sew ribbon to lining with about a 1/4 inch seam allowance.
  17. Toddler Purse Tutorial

    Toddler Purse Tutorial

  18. Insert lining into outer bag with right sides facing (ribbon strap should be inside between the two layers). Pin around top edge to hold the lining and outer bag together.
  19. Toddler Purse Tutorial

  20. Seam around top edge, leaving about a 3 inch opening to turn bag right side out.
  21. Gently turn bag inside out through opening. Fold liner into outer bag.
  22. Iron around top edge to flatten, then topseam around edge.
  23. Toddler Purse Tutorial

    Now, sit back and admire your work!

Related Posts Plugin for WordPress, Blogger... 20 Comments